Click vinyl is celebrated for being one of the most DIY-friendly options on the market. However, even seasoned professionals can slip up if they rush the process. There are several common mistakes when installing vinyl plank flooring that can turn a dream renovation into a nightmare of buckling boards and creaking joints.
The good news is that most of these issues are entirely preventable. By understanding the science of the material—how it reacts to heat, moisture, and uneven surfaces—you can ensure a flawless finish. In this guide, we highlight the pitfalls to watch out for so you can get it right the first time.
Jump To Section
- Skipping Acclimatisation: A Major Error
- Subfloor Neglect: The Root of Many Mistakes
- Ignoring Expansion Gaps Around the Perimeter
- Poor Layout Planning and Staggering
- Damaging the Locking Mechanism
- Forgetting to Check Moisture Levels
- Preventing Common Mistakes When Installing Vinyl Plank Flooring
Skipping Acclimatisation: A Major Error
One of the most frequently cited common mistakes when installing vinyl plank flooring is impatience. When your new boxes of Pro-Tek™ arrive, the temptation is to start laying them immediately.
The Mistake: Vinyl is reactive to temperature. If the planks have been stored in a cold warehouse or the back of a van and are immediately brought into a warm house and installed, they will expand as they warm up. If they are installed cold, they might buckle later. Conversely, if installed hot in a cold room, they may shrink and leave gaps.
The Fix: Always leave the unopened boxes in the room where they will be installed for at least 48 hours. This allows the vinyl to stabilise to the room’s ambient temperature.
Subfloor Neglect: The Root of Many Mistakes
You cannot build a great house on a weak foundation, and you cannot lay a great floor on a bad subfloor. Neglecting this step is high on the list of common mistakes when installing vinyl plank flooring.
The Mistake: Click vinyl is rigid, but it isn’t magic. If your subfloor has dips, humps, or debris, these imperfections will eventually “telegraph” through to the surface. Worse, unevenness puts immense stress on the click-lock mechanism, causing joints to snap or pop open when walked on.
The Fix: Check your subfloor with a straight edge. It needs to be clean, flat, and dry. If there are uneven spots, use a self-levelling compound or a suitable plywood base at least 12mm in thickness.
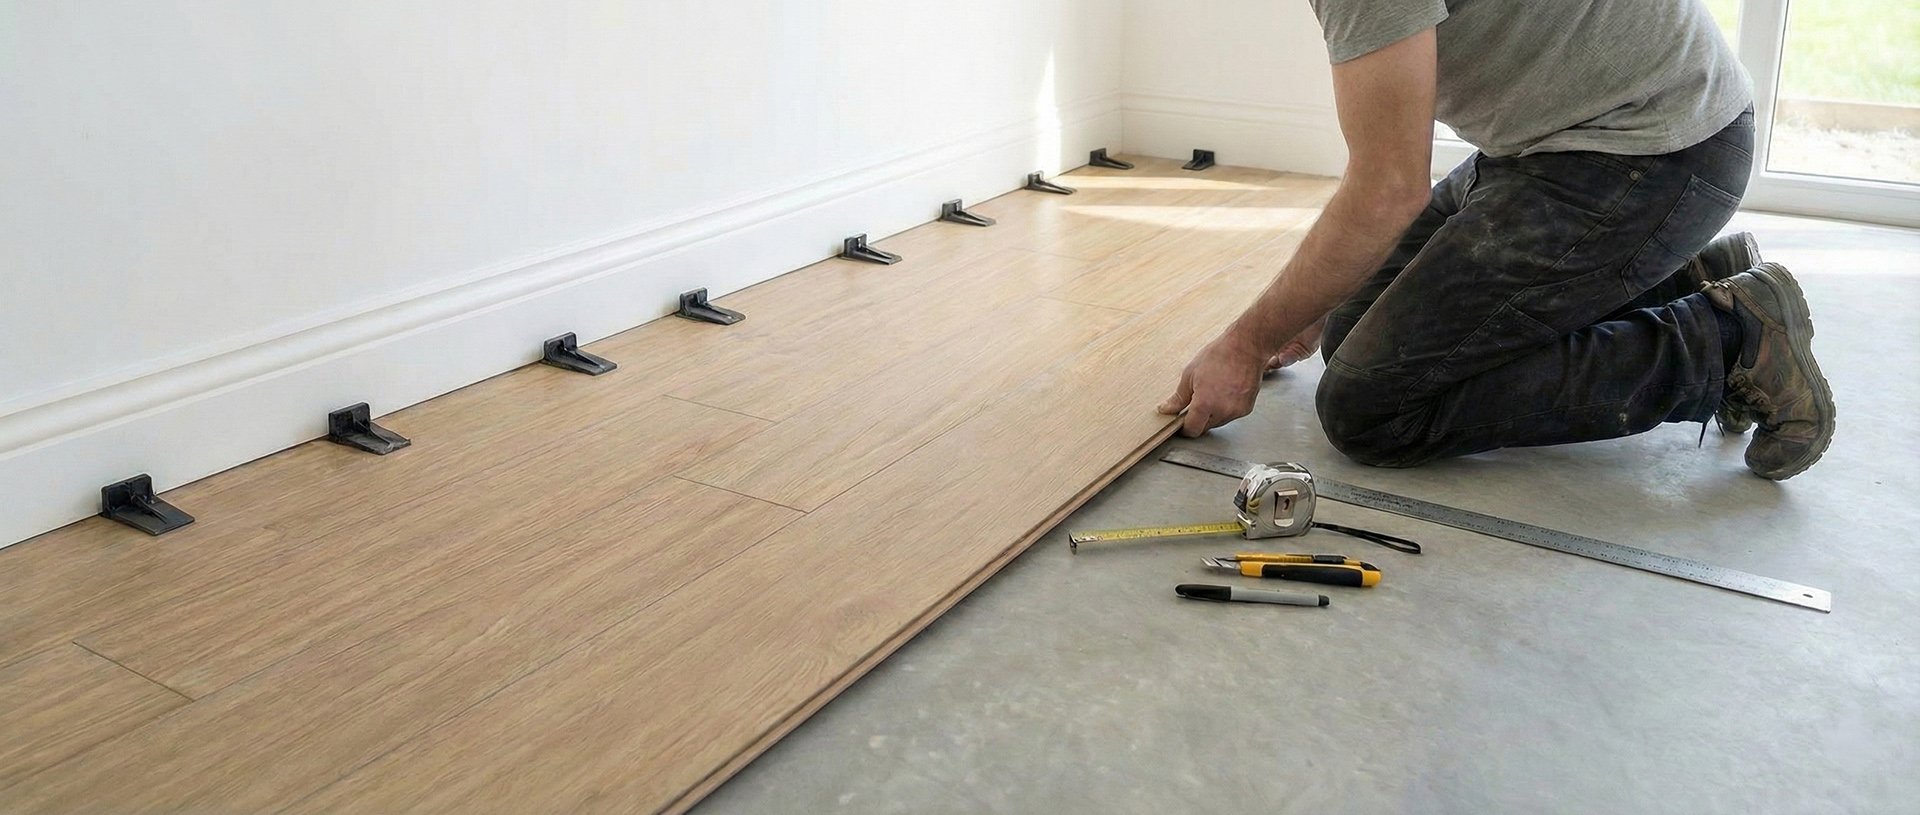
Ignoring Expansion Gaps Around the Perimeter
Vinyl flooring is a “floating floor,” meaning it is not glued down. It needs to be able to move freely. Forgetting this is one of the most critical common mistakes when installing vinyl plank flooring.
The Mistake: Fitting the planks tight against the wall or skirting board might look neat initially, but as soon as the room warms up, the floor will expand. With nowhere to go, the planks will be forced upwards, creating a “speed bump” or buckle in the middle of the room.
The Fix: Always use spacers to maintain a 6-10mm gap around the entire perimeter of the room, as well as around pipes and door frames. This gap will be hidden by your skirting boards or scotia trim later.
Poor Layout Planning and Staggering
Aesthetics matter just as much as mechanics. A rush to start laying boards often leads to a visual disaster.
The Mistake: Lining up the end joints of adjacent rows (creating a “H” pattern) or having “steps” that are too uniform looks artificial and weakens the structural integrity of the floor. Another error is ending up with a tiny sliver of plank at the far side of the room because you didn’t measure the width beforehand.
The Fix: Plan your layout. Measure the room width and divide by the plank width to ensure you don’t end up with a thin strip at the wall. Stagger your joints randomly (at least 15-20cm apart) for a natural, professional look and a stronger lock.
Damaging the Locking Mechanism
Modern click systems like Uniclic™ are robust, but they require the correct technique.
The Mistake: Using brute force to tap planks together is one of the common mistakes when installing vinyl plank flooring that causes immediate damage. If you hit the edge too hard or at the wrong angle, you can shave off the tongue or crush the groove. This prevents the plank from locking securely, leading to loose boards later on.
The Fix: Use a tapping block and a rubber mallet, never a metal hammer directly on the vinyl. If a plank doesn’t click in easily, stop. Check the groove for debris rather than forcing it.
Forgetting to Check Moisture Levels
Just because vinyl is waterproof doesn’t mean you can ignore moisture underneath it.
The Mistake: Laying vinyl over a damp concrete subfloor (especially in new builds) can trap moisture. This trapped water can cause mould to grow beneath the floor or force the adhesive/backing to fail.
The Fix: If installing over concrete, perform a moisture test. If the relative humidity exceeds 75%, apply a liquid Damp Proof Membrane (DPM) first.
Preventing Common Mistakes When Installing Vinyl Plank Flooring
Installation doesn’t have to be stressful. By taking the time to prep your subfloor, acclimatise your planks, and plan your layout, you can avoid these pitfalls easily.
Steering clear of these common mistakes when installing vinyl plank flooring ensures that your Pro-Tek™ floor remains beautiful, stable, and covered by its lifetime warranty for years to come.