Thank you for choosing Pro-Tek™ wall panels. This guide provides a summary of the installation process.
Important: Please ask your installer to check each panel for defects before cutting or fixing. Read the full, detailed installation guide prior to starting, as improper installation will void any guarantees.
Before You Install: Key Requirements

- Wall Condition: The wall must be structurally sound, dry, clean, and flat. It must have a flatness tolerance of no more than 2mm over a 2-metre span.
- Room Environment: The room temperature must be maintained between 15°C and 25°C before, during, and after installation. A permanent or temporary HVAC system must be operational.
- Wall Humidity: The wall’s moisture content must not be higher than 8%.
- Acclimatisation: Wall panels must be stored flat and allowed to acclimatise for 24 hours in (or very near) the installation area before fitting.
Proper preparation is essential for a successful installation.
Preparing Your Walls (Substrates)
SPC wall panels can be installed on a variety of surfaces, including concrete, plaster, and various boards. All substrates must be structurally sound, dry, clean, flat, and free from contaminants like wax, oil, or loose paint.
- Cement / Concrete: The surface must be completely clean and dust-free. Depending on the hardness of the existing wall, you might need additional adhesive to properly secure the panels.
- Tiles: All tiles must be removed prior to installation. Removing tiles will likely damage the wall behind, meaning you will need to repair or refinish the wall to make it flat and stable again. We recommend instructing a professional to undertake this work.
- Plaster: Use a sanding machine to flatten any protruding, uneven surfaces. Ensure the wall is completely clean and dust-free.
- Boards (HDF, Sheetrock, Plywood, Timber, etc.): Ensure the surface is free of contaminants and dust. Similar to concrete, the condition (hardness) of the wall may require additional adhesive for a secure fit.
Planning & Tools

Tools Needed: Key tools include a utility knife, circular saw (fine tooth blade), hole saw, construction-grade adhesive, waterproof silicone, a rubber mallet, and a measuring tape.
People: Installation requires 2 people.
Layout: Before you begin fitting the panels, follow these planning steps:
- Plan your layout to avoid panel joints near openings or corners.
- Installation should always proceed from left to right.
- Mark and cut any holes for plumbing (e.g., shower heads) before installing the panel. Drill from the back or use tape on the front to prevent chipping.
CRITICAL: You must leave a 4mm expansion gap at the top (ceiling) and bottom (floor) of every panel.
Installation Steps: Overview
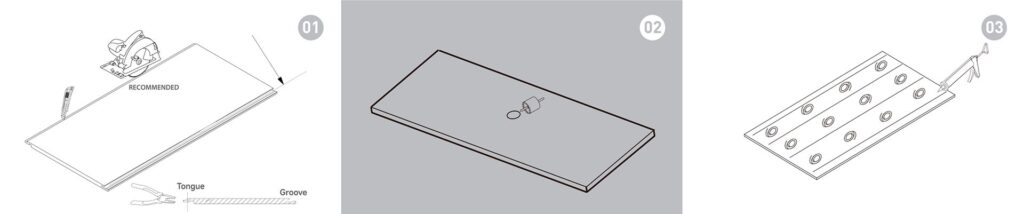
- 1. Cutting to Size: Cut the panels to the required height. A circular saw with a fine blade is recommended for a clean cut. Alternatively, score the panel multiple times with a utility knife and snap off the excess.
- 2. Cutting Holes: Before attaching to the wall, use a drill with the appropriate size hole saw to create any necessary openings for plumbing, such as shower heads.
- 3. Applying Adhesive: On the back of the panel, apply 4 evenly spaced beads of construction-grade adhesive along its length. Add smaller “dots and dabs” of adhesive between these main lines for extra hold.
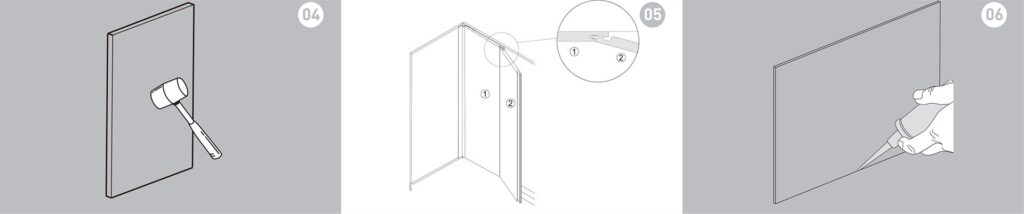
- 4. Fixing to Wall: Press the panel firmly against the wall. Use a rubber mallet, tapping from top to bottom, to ensure a tight connection and remove any air bubbles behind the panel.
- 5. Joining Panels: Position the next panel at an approximate 35-degree angle and push its tongue edge into the groove of the previously installed panel before pushing it flat against the wall. Always ensure you leave the vital 4mm expansion gap at the top and bottom.
- 6. Sealing: Once installed, apply waterproof silicone sealant to the expansion gaps at the floor and ceiling, as well as around any drilled holes, to ensure the surface is completely watertight.
Aftercare
- Curing: Wait 24 hours for the adhesive and silicone to cure before using the area (e.g., shower). A full cure takes around 7 days.
- Cleaning: Use a mild cleaning agent and a soft cloth. Do not use abrasive cleaning products.
- Hanging Objects: To hang heavy items (e.g., shelves), you must drill through the panel and fix the item securely into the wall behind it.
Accessories Installation (Optional)
Add outer corner trims and end cap trims to any open ends of the wall panels. Please see the examples below:

Pro-Tek supplies include internal corner, external corner trims, end cap trims and T-joint trims. Once cut to size, apply construction grade adhesive to the back of the trim piece. Carefully position the trim and push it into place. Use silicone sealant to waterproof edges and corners. Wipe away any excess adhesive or silicone straight away.